> ## Documentation Index
> Fetch the complete documentation index at: https://bunnynet-cb9733c2-support-migration.mintlify.site/llms.txt
> Use this file to discover all available pages before exploring further.
# Quickstart
> Install and configure the bunny.net cPanel plugin on your WHM server.
This guide walks you through installing and setting up the bunny.net cPanel plugin on your server.
## Prerequisites
* cPanel/WHM server with root access
* A bunny.net account with an API key
* Access to the plugin repository (requires approval)
The plugin repository is protected. To get access, [contact our sales team](https://bunny.net/contact-sales/).
## Install the plugin
Install the plugin using either APT or RPM depending on your server's package manager.
Configure the APT repository:
```bash theme={null}
cat < /etc/apt/auth.conf.d/bunnynet-cpanel.conf
machine https://cpanel-repo.bunny.net
login username-goes-here
password password-goes-here
EOF
```
```bash theme={null}
cat < /etc/apt/sources.list.d/bunnynet-cpanel.sources
Enabled: yes
Types: deb
URIs: https://cpanel-repo.bunny.net/deb
Suites: stable
Components: main
Architectures: amd64
Signed-By:
-----BEGIN PGP PUBLIC KEY BLOCK-----
.
mQINBGh3oPsBEADPYVnsIf4W10dG90KtpeUciVROjJB+/cEzBgU1nHPGcM1o043R
4LYfbTkDN3kYQwp0SVBn8BeNyYHIzXjothRV9w41J6dzA074GcFoyNE0JsihdX/t
0ZMO0VunkcSYE3nQEq5sw5pweb6DB0nqYSGd8uG+0baIjoOJmDTTDysyLvSp8YLd
4NRK48AC7gCTOrYsDm1EqJFO64OPn27DdfB0mte/LNIxKBrUkX2omw0IPv89lIN8
0ckeMW9PgNRHuUFLttNWProw3qSAkqu29R4hwH374qJmooO0NP8Jh41KmG5uefrR
PnWM29+CW1EEbvqgh7un7kB9NQdDGfMhTryfXsoYDjkqfYlM5+KThMsgWFJILPdR
NyB/UvyyuL40XFydKGiEFUa/OjuuPjub9Zdhec28tpHrg73yFyr9AtjySdpSiED3
vg/gBHTnzmKgkRJH61Vo6/rqcGCk3ZwsARbQn1Mg+AwQuYS8MQfSDzon3jZ8poAU
V2ChYtdT2w0vBlZ2aaVrlv9e+2hcLZq5qyZzYB4exfhdm0kWElAYlig+rfFQbUcz
E26gpfbNMqWK+/dR3HYmqHmt2PZFha/OvG7Au5mSGnocH4vfO+ih+dBmPvXUYzDC
X4BJ83/qQS8OeFBlvRe1bh/Wom+SuHC8U6VmcTdhq7TDYkuIyeu884hQlwARAQAB
tDFidW5ueS5uZXQgY1BhbmVsIFBsdWdpbiA8Y3BhbmVsLXBsdWdpbkBidW5ueS5u
ZXQ+iQJOBBMBCgA4FiEELDzERi4ZAA/HE+ZlMRADpKDgpC8FAmh3oPsCGy8FCwkI
BwIGFQoJCAsCBBYCAwECHgECF4AACgkQMRADpKDgpC93WRAAlo0uWrrFgzfCI3KL
ubrva9jBeuOdJ2FQFpKDIglUN7hCRZGF8+zfdbDizTORqoKuI+IGdpcW4Xlv3eik
9j7gQ4AMK+4xsnkpnzobCb40RlZE3wCaEHhMzAOko3o75M+5vYXRu9Io+2LLXzr9
Bgh5RQQ7wVmG9CAhkBwGhD+PNfZIEZjqnobLDA9Ts7uN4hSAlpgQeLRfae3E5Xuu
CkRkMZYDVJc3O/uKsMLziw4p0Ck7URjHS0C/5c0qLtZYfupTW9rnVqmsFz3enTni
IIfBPcyP95RtmVCuKttqHRHvcgokWqd6y3Ts1ExCKPP1aVeohUQtc+UwXy+J/Xc2
wi/kQH7BGQZp5AWtaFQ6ORYek/Avtjeo1mySHmAAhNAMKJd3nzeBXnX5IrpAy6So
/tcVL3Y5g4dLeEMJBBHzZqVKPe4LNVynV+k1zsCG6MCuof5KfGKLlVG7GhkeV5bg
yLDg7CRXU7Hi3tibkHJdkADA+EGomjmALl3I06oDM91Xsiqi98/xkDGj2Wu6wHlf
X6HTi4xWsN2d0aMi0kLyY693xAJqdmHCf8L9TjTHptKCbSxgzyy6bfF80w9nVPag
uAnXW7FRIZ0WsOArKm0bZdCvvoddH0/aDTaDkLa+xhoflKpbBpkFbufc1bNb2uke
5U00QjAZa8bU1qsdyvOteL48lmk=
=/1ex
-----END PGP PUBLIC KEY BLOCK-----
EOF
```
Install the packages:
```bash theme={null}
apt install bunnynet-cpanel bunnynet-cpanel-daemon
```
Configure the RPM repository:
```bash theme={null}
cat < /etc/yum.repos.d/bunnynet-cpanel.repo
[bunnynet-cpanel]
name=bunny.net cPanel Plugin
baseurl=https://cpanel-repo.bunny.net/rpm
gpgcheck=1
gpgkey=https://cpanel-repo.bunny.net/gpg.key
username=username-goes-here
password=password-goes-here
EOF
```
Install the packages:
```bash theme={null}
dnf install bunnynet-cpanel bunnynet-cpanel-daemon
```
## Set up the plugin
After installation, open WHM and navigate to the **bunny.net cPanel plugin** page.
The plugin requires a DNS cluster to be configured. Click **Setup DNS cluster** to open the DNS Cluster configuration page.
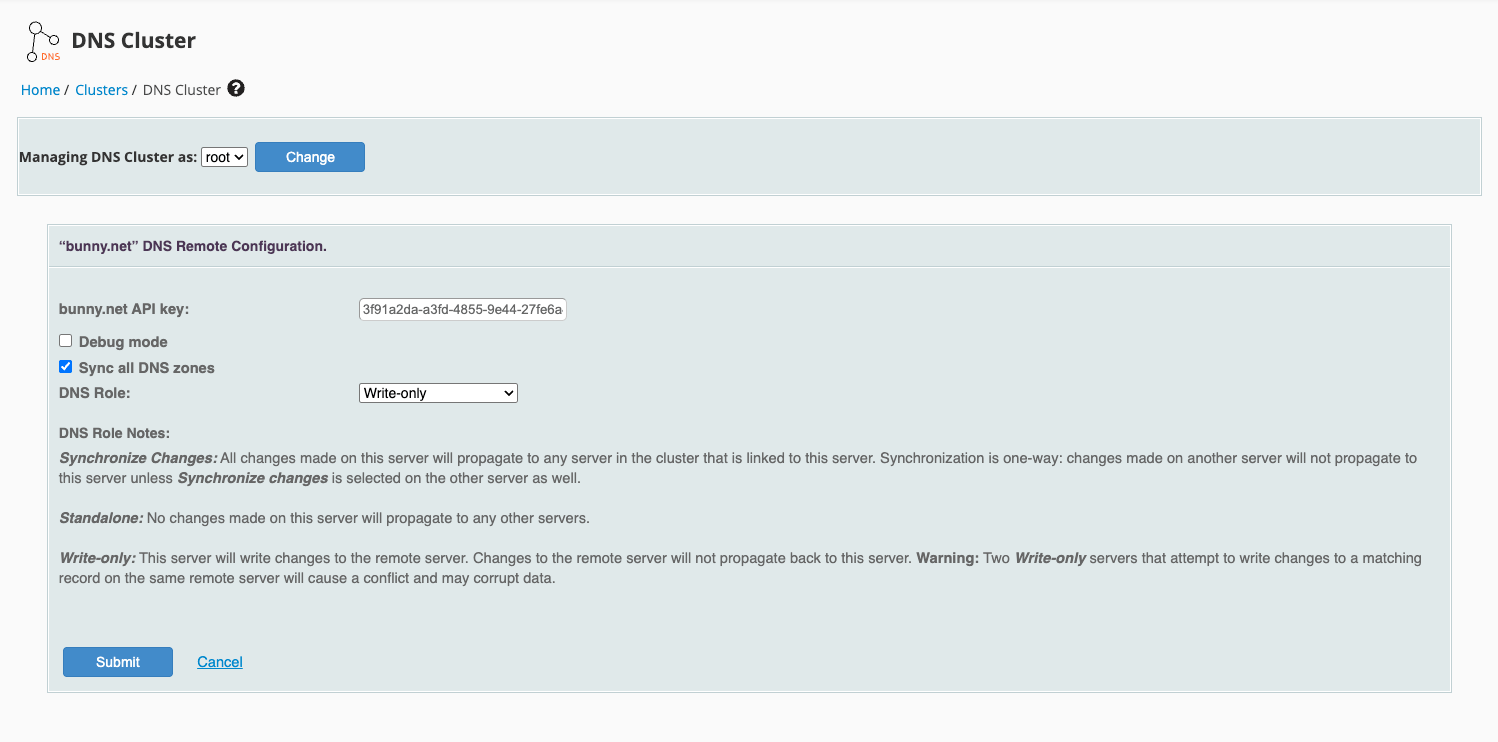
The DNS Role must be set to **write-only**.
 On the DNS Cluster page, select **cPanel** as the Backend Type and click **Configure**.
 Enter your **bunny.net API key** and set the **DNS Role** to **Standalone**.
You can also enable **Sync all DNS zones** to automatically synchronize all existing DNS zones to the cluster.
You can find your API key in the [bunny.net dashboard](https://dash.bunny.net).
Enter your **bunny.net API key** and set the **DNS Role** to **Standalone**.
You can also enable **Sync all DNS zones** to automatically synchronize all existing DNS zones to the cluster.
You can find your API key in the [bunny.net dashboard](https://dash.bunny.net).
 Back on the plugin page, enter your **bunny.net API key** and click **Setup**.
 The setup is complete. The plugin will display your API keys and the available pricing zones.
The bunny.net API key also needs to be updated on the DNS cluster. If you see a warning about this, update it in **Clusters > DNS Cluster**.
The setup is complete. The plugin will display your API keys and the available pricing zones.
The bunny.net API key also needs to be updated on the DNS cluster. If you see a warning about this, update it in **Clusters > DNS Cluster**.
 After setup, you can configure bunny.net features per hosting package under **Packages > Edit a Package**.